My Spot

Tuesday, May 31, 2016

Morning Rainbows

Morning Rainbows

Taken during my morning walk with my dog. I even soaked my phone in the rain for this photo - I had no umbrella with me and both my dog and I came home completely wet. What a fantastic start of the day with a double rainbow! :-)

Sunday, May 15, 2016

Recycling Plastic Bottles: Toy Cars

Recycling Plastic Bottles: Toy Cars

Plastic bottles are an endless source of fun and play. A little imagination and an old detergent bottle becomes a toy car!

Here's how to make one:

1) Make four holes into the bottle - 2 in the front and 2 in the back. Just make sure that the holes are low enough on the bottle, so that the bottle will actually stand on wheels and not on its flat side.

2) Insert drinking straws through the holes. Make sure that a little bit of straw sticks out of each hole - this will act as a spacer so that the wheels won't touch the bottle and get stuck. While this step is not absolutely necessary, I do find it that the wheels spin more smoothly and more quickly if  the straw is in place.

3) Add the wheels. Use any kind of bottle caps or jar lids you want. Just make sure that you punch the hole precisely in the middle of each lid. Then, get two wooden skewers - these will be the car's axles. Take one skewer, put one wheel on one end of the skewer, push the skewer through the straw and put the second wheel on the other end of the skewer. Do this for both sets of wheels.

4) Enjoy playing with your new car :-)

A tip for the making:
While the holes can be make by hand, I usually use an electric drill to make all the holes in the bottle and the jar lids. I use Number 5 drill for the holes in the bottle and Number 3 drill for the holes in the lids.

These cars go extremely fast and cover very long distances. The best thing about them is that even if they get broken, you can always make more - just get the parts from your recycle bin :-)

Saturday, May 14, 2016

Recycling and Upcycling

Recycling Plastic Bottles: Bucket and Spade

Recycling Plastic Bottles: Pencil Holder

I'm extremely enthusiastic about recycling things. Or, perhaps a better term is "upcycling": creating new useful things out of materials that many people would just toss away. A particularly good source are plastic bottles. I especially like empty detergent bottles, since they come in all shapes and sizes and can be turned into just about anything from organizers to toys.

On the first photo, you can see how easy it is to make a unique bucket and spade for the sandbox or the beach. Just cut off the top part of a big detergent bottle  and you're done! However, I've decided to use the "bucket" as a carrier for all sorts of supplies for the summer activities with the neighbour's grandchildren (it's big enough to stuff anything from paper to balloons, old CDs, marbles, and a bunch of other things in there for the kids to play and create with), so I used some ducktape to line all the edges. I'll give the spade to the children to play with in the sandbox.

The best about these things is that they are practically indestructible! And even when they do get destroyed you can always make more from all those  bottles that would otherwise get thrown away!
In the middle I've left a little pile of shavings and cuts - this is all that got thrown away in the end. Ecological or what? :-)

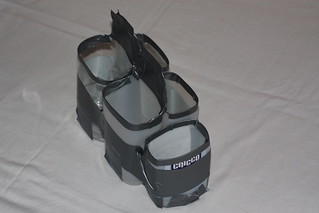
The second photo shows another recycling project that you can throw together in a matter of minutes: a stationery carrier to organize all the pens, pencils, scissors, staplers and other things that would otherwise lie around on the table.

I simply used 5 empty detergent bottles cut in half and taped them together with a bit of ducktape. Now, you could use paint to colour each bottle and then use hot glue to glue the colourful bottles together - this would make a very pretty table organizer. However, I've made this with the sole purpose of stuffing it with stationery supplies and take it outside into the garden to make and build new things with the neigbour's grandchildren. This organizer will get tossed around all summer long, so making it extremely pretty was not my priority. I just wanted to make it as simple and as durable as possible and the combination of plastic bottles and ducktape does the job perfectly!


Sunday, May 01, 2016

Wind Spinners

My New Wind Spinners :-) Tutorial on How to Make a Wind Spinner from a Plastic Bottle

A few days ago I found a fantastic tutorial on how to make these beautiful whirligigs and I immediately made some for my windowsill.
However, I've also made a modified photo tutorial on how to make these whirligigs from a plastic bottle. Check out my Flickr page for the whole tutorial!