My Spot

Tuesday, February 28, 2012

Visual comes in many forms...

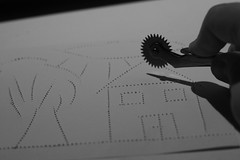
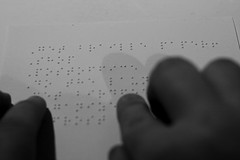
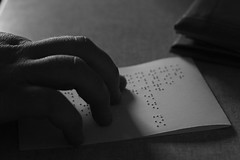
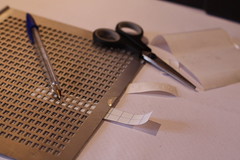
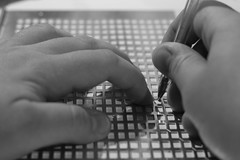
The other day some friends came around for a visit. They brought their two little children with them. The kids love to draw and whenever I was at my friends' house I would draw pictures for the two children and they would colour them. This time, however, I couldn't draw for them, since I can't see my pen and paper. But even if you're blind, you can still draw. So, the kids became totally enthusiastic when I took out my drawing tool: a spiky metal wheel on a wooden handle. I embossed some pictures for them and the two were absolutely thrilled when they tried to identify my pictures with their eyes closed! I had to keep the pictures simple: a cat, a dog, a flower, and this little house with a garden. The kids took the pictures home with them. This one got left behind, so I decided to photograph it together with my drawing tool and show you that blindness doesn't mean the loss of visual - it just means that the visual comes in a different form.

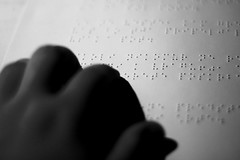
Drawing with the tool works the same as embossing Braille. You roll the spiky wheel over the paper and draw the mirror image of a picture. When you flip the paper over, you can run your fingers over the bumps of the picture.

Blind beading

Blind beading by Cobra_11
Blind beading, a photo by Cobra_11 on Flickr.

I love arts and crafts. One of my favourite activities is beading. You might think that blind people can't do precise things such as sewing beads. Wrong! Today, I decided to make a bracelet from Hama beads. As you can see, I'm using my left hand to feel for the beads. I'm holding the needle in my right hand in such a way that my index finger is close to the tip of the needle - this prevents me from getting pricked with the needle when putting beads on. The beading is going a bit slower than it would otherwise (it took me about an hour to do 5 cm of the bracelet), but that doesn't matter. There is one more thing, though: the colours of the beads. Blindness doesn't mean you have to give up on them. Sorting out beads by colours (you can buy packets of beads that are pre-sorted already, which is very helpful) can help you make a colour-coordinated bracelet. However, since I prefer colourful bracelets, I just use a big box of mixed beads.

Not being able to see my bracelet, I just feel my work with my fingers. I'm learning about arts and crafts from an entirely different perspective. The colours aren't important any more. What matters is the precision of my work and how equally the beads are sewn together. I'm learning aesthetics from a different point of view.

Monday, February 27, 2012

Blindness isn't black

Blindness isn't black by Cobra_11
Blindness isn't black, a photo by Cobra_11 on Flickr.

People who can see rely on their sense of vision so much that they almost ignore their other senses. However, that's a big mistake. I've come to the conclusion that the world of darkness is actually very vivid. Every single thing I touch has a different texture, temperature, shape, size and carries a different kind of information. I also rely on my sense of hearing. Every single thing has a different sound. For example, hearing waterdrops fall into a glass of water has a particularly pleasant sound. Then there's the sense of smell. In fact, I'm being bombarded with information even though I can't see. Blindness isn't black - it's vivid and swarming with information!

Not lost

Not lost by Cobra_11
Not lost, a photo by Cobra_11 on Flickr.

Exploring the world around you only through touch can be intimidating. Many people would just start fluttering around with their hands, fearing to hit something or bump into something and fall. However, there is absolutely no need to panic. The one thing you always have to keep in mind is to be very organized. I know my apartment and I know where everything is. However, sometimes finding your location is still important - especially in the kitchen, where an accident could easily happen. So, I always feel my position before turning around or opening something. Running your fingers along the edges of cupboards and other surfaces is a great way to always know your location.

Saturday, February 25, 2012

Adaptations...

Adaptations... by Cobra_11
Adaptations..., a photo by Cobra_11 on Flickr.

Many people think that blindness is something scary and horrible and that blind people can't have fun. However, that's totally wrong! Sometimes, all that's needed are a few small adaptations...

I love Rubik's cube. It's a great way to unwind the daily stress in a just a few minutes. However, a typical Rubik's cube is a strictly visual toy: you have to see the colours to be able to arrange them. But if you make a few small adaptations to this classic toy, you can still have fun even if you can't see. I made this one myself. I used little glittery studs and glue to write "RUBIK" on 5 sides of the cube in Braille and I left the sixth side of the cube empty. However, there are other ways to make a Rubik's cube for the blind: you can use little squares of different materials for every side of the cube (for example, wood, metal, foam, etc.); you can paste different shapes on every side (one side would have squares, one would have circles, etc.); you can use different sizes of beads for every side of the cube; etc. This way, playing with a Rubik's cube is possible just by touch.

Friday, February 24, 2012

How I learnt Braille alphabet

How to learn the basic Braille alphabet:

1) The basic Braille cell for every letter has 6 dots numbered in this sequence:
1 4
2 5
3 6

2) Line a-j is the base line. You simply have to memorize it.

3) Line k-t is the base line with the addition of dot 3.

4) Line u-z is the base line (the letters a-e only) with the addition of dots 3 and 6.

5) The only exception to this is the letter W, which is the mirror image of the letter R.

6) In addition to the original Braille alphabet there are the letters Č, Š, Ž, which are the letters found in Slovene alphabet.

7) The punctuation is the base line a-j moved down one level.

8) There are also some double letterings and symbols for words on my table.

As I have already explained on my previous photos, I now use only my sense of touch to read and write Braille. However, when I was learning it, I was still using my sight. This is the method I used. It only took me a couple of hours to memorize the entire alphabet. Try if for yourself! It's not that difficult :-)

Thursday, February 23, 2012

"Get Braille paper!"

"Get Braille paper!" by Cobra_11
"Get Braille paper!", a photo by Cobra_11 on Flickr.

This is my "to-do" list for today. The first line reads "Get Braille paper!" Writing Braille doesn't require only a special tool (the slate and stylus), it also requires special paper. Braille paper is thicker, softer and "stretchy" because it's made from longer fibers than the normal paper. Writing Braille works with any paper, though, and for daily stuff I do use regular paper. However, if I want my writing to be more durable, I use Braille paper. But it's not just durability that is important with Braille paper. It's also the way the bumps are embossed. In regular paper the bumps get little tears at the very top, which makes them kind of coarse. Braille paper "stretches" when the bumps are embossed, so the bumps are neat and not pierced through at the top.

Lego Braille teaching aid

Lego Braille teaching aid by Cobra_11
Lego Braille teaching aid, a photo by Cobra_11 on Flickr.

A good way to start learning Braille is to use some sort of model with big Braille bumps. There are quite a few such Braille teaching aids available: from keychains to little Braille blocks. Although I already know Braille and can recognize it in its standard size (as it is embossed on paper), I decided to make myself such a Braille teaching aid - just because it's fun to twirl it around in your hand and recognize the letters that are being "written". As you can see, I used Lego to build it. The three white levels of the cube can be turned for 360°. By turning the levels, Braille letters are being formed with the bumps. For example, here on the photo is the letter "t": the middle level slightly turned to the left just to illustrate how the levels can be turned.

I have already posted a photo, which shows how I recognize Legos using only my sense of touch. Building Legos blind is quite challenging, but still a lot of fun and I'm getting quite good at it: it took me about 20 minutes to put this together.

Wednesday, February 22, 2012

Braille shopping list

Braille shopping list by Cobra_11
Braille shopping list, a photo by Cobra_11 on Flickr.

I'm absolutely terrible when it comes to shopping for groceries. I always seem to forget something. Shopping lists are therefore a must for me. So, just before I head out to the shop, I always double-check if I put everything I need on the list. Today, I spent quite some time checking what I need to get. I used the Braille labels I've made for everything in the kitchen to check which things are running out and what I need to buy. Then, I sat down and carefully wrote my shopping list in Braille. Things do take a little longer when you can't see, but you get such a sense of achievement when you discover that you can make your way around just by seeing with your hands.

Lego from a different point of view

As you probably know, I love Lego. Lego bricks are both a very visual toy due to their bright colours, and a very tactile toy since you have to use your fingers to make things. However, if you can't see your Lego bricks, you have to get to know them by touch. I had to run my fingers along the edges of the bricks to learn their shape. I also had to feel how thick the bricks were. Finally, I had to count the little bumps to know the size of the bricks. Building things this way is quite intriguing and it's a completely new way of discovering Lego!

Tuesday, February 21, 2012

Blind poetry

Blind poetry by Cobra_11
Blind poetry, a photo by Cobra_11 on Flickr.

I've put up some of my favourite quotes and poems transcribed in Braille on the walls, so that I can read them whenever I want.

This one is by William Blake:
"To see a world in a grain of sand,
And heaven in a wild flower,
Hold infinity in the palm of your hand
And eternity in an hour."

Life is in little things

Life is in little things by Cobra_11
Life is in little things, a photo by Cobra_11 on Flickr.

Have you ever thought about how you would fill a glass of water if you couldn't see the glass and the water and you could only use your sense of touch to do the task? A very effective way is to put the tip of your finger over the edge of the glass. When you feel the water on the tip of your finger, stop - the glass is full.

Monday, February 20, 2012

There's more than one way to see...

To find out what's in the jar you can look through the glass, you can open the lid and look inside, or you can use your fingers to "see" the contents written in Braille.

I can read Braille with both my right and my left hand, so it doesn't matter which one I use to feel the embossed letters. Reading Braille with both hands is easier, since it helps you find the next line in the text, but using both hands is not necessary. You can read just as well with just one hand or just one finger. However, being able to recognize Braille with both hands sure is practical.

I've labelled everything in the kitchen with Braille, and I now use the labels to find what I want. I'm also making labels for other things around the apartment.

Sunday, February 19, 2012

Tactile

Tactile by Cobra_11
Tactile, a photo by Cobra_11 on Flickr.

It's my Mum's birthday today! I've made her this card to put together with the present. It says "Happy birthday, Mum! Your daughter"

Sun's Flame

Sun's Flame by Cobra_11
Sun's Flame, a photo by Cobra_11 on Flickr.

A few days ago we had a magical sunrise. I've never seen anything like this before! It looked like the sun had a flame! It lasted for a few minutes and it was just magical!

Saturday, February 18, 2012

Making Braille Labels

Making Braille Labels by Cobra_11
Making Braille Labels, a photo by Cobra_11 on Flickr.

I've been trying to get a Braille labeler, but they're all so expensive. So, I decided to make my Braille labels by hand. Plastic Dymo tape, which is usually used for Braille labels, is quite expensive, so I came up with a cheaper solution. I bought a roll of self-adhesive plastic foil, cut a few 1-inch (2 cm) stripes and used my Braille slate to emboss the Braille letters on it. It works great and I can now organize everything!

Friday, February 17, 2012

Feel

Feel by Cobra_11
Feel, a photo by Cobra_11 on Flickr.

I mentioned before that writing Braille is done in reverse: you write from right to left and you have to write the mirror image of every letter. When you flip the page over, you get the text written correctly and can read it from left to right with the letters written correctly.

This is what writing Braille looks like. I learn "blind writing", so I only use my sense of touch to write. I have to feel every Braille cell separately before I emboss the letters into the paper. My left hand runs along the cells in the line and I punch the bumps into the paper with my right hand. When I come to the end of the line, I move down to the next line and repeat the process.

As far as the orientation of the pen within each cell goes, you get the feeling where and how to move the tip. You can also use the sides of the cell to find the correct position for the tip of the pen and then press down to make the bumps in the paper correctly.

You'd be surprised, but, as complicated as this process looks, it is actually much easier if I do it in the dark or with my eyes closed. If I try to write Braille by looking at the cells on the slate, I get totally confused and make nothing but mistakes. However, if I "write blind", I hardly ever make a mistake any more.

Oh, one more thing: you can see that I'm holding a pen in my hand. When I got the slate, I could not get the Braille stylus. So, a friend who is blind and has used Braille all his life told me that using a pen to emboss Braille works just fine. I use an old BIC pen with a medium tip so that I don't tear the paper.

Thursday, February 16, 2012

Spring is here!

Spring is here! by Cobra_11
Spring is here!, a photo by Cobra_11 on Flickr.

Here in Slovenia we have a proverb: "St. Valentine brings the key to the roots." It means that spring is coming. I noticed this little crocus on St. Valentine's Day and today it finally opened up :-)

Wednesday, February 15, 2012

Seeing With My Fingers

Seeing With My Fingers by Cobra_11
Seeing With My Fingers, a photo by Cobra_11 on Flickr.

Learning Braille is going quite nicely. Learning to write was a piece of cake. I'm building up on the speed of writing every day. Practicing reading, however, is a bit trickier. Since I'm learning "blind reading", I'm only using my sense of touch to feel the little bumps in the paper. I got the hang of it quite quickly, but I still need a lot of practice before I'll be able to read fluently.

Unlike with the visible writing with a pen, where you just use one hand to write and no hands at all to read, you need to use both hands with Braille. When writing Braille, you have to feel the cells in the slate with one hand and write with the other. With reading you need to use one hand to read and the other to mark the next line. I read with the fingers of my right hand and I mark the next lines with my left.

Another challenge with reading is that my sense of touch is not particularly sharp, since I've never had to use it before for feeling such delicate things as bumps of Braille writing. However, the more I practise, the sharper my sense of touch gets.

I must say that seeing with my fingers is quite a challenge, but I'm getting better every day.

Saturday, February 11, 2012

Snow Crystals On A Rope

Snow Crystals On A Rope by Cobra_11
Snow Crystals On A Rope, a photo by Cobra_11 on Flickr.

It's been snowing constantly for the past week or so and we're in the middle of a winter wonderland right now... I've been trying to take a photo of a snowflake for a long time and I finally succeeded - and without a macro lens! :-)