My Spot

Thursday, April 14, 2016

Bottle-Cap Owls

Bottle-Cap Owls

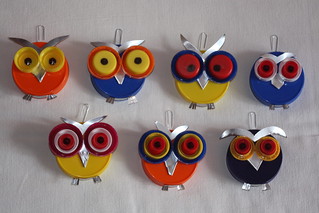
I love making things. Recently, I came across an interesting idea on the Australian site "Better Homes and Gardens" (in this article)
on how to make recycled lid owls. Well, I couldn't find any tin jar lids around the house, but I have plenty of plastic ones. So, I got out my hot glue gun, a bunch of plastic bottle caps and lids, some paper clips and an old plate control strip (it's a suprasetter plate that my neighbour threw away once and I took it and stored it for making decorations).
Here's how it's done:

1) Take the lids and the bottle caps and arrange them into different faces.
2) Make the beak, the eyebrows and the feet from tin. I used my suprasetter plate, but you could simply take any tin can from a soft drink, cut it up and use that instead. The only thing that's important is that you can cut the tin with regular scissors and bend it with your fingers. This way, no complicated tools are necessary AND you can easily glue everything together.
3) The first element to be glued onto the owl is the beak. For the beak, cut a square and fold two corners in to make  triangle. Then glue it on the large lid.
4) Next, glue the eyes. Just arrange the bottle caps the way you want and start gluing. First, glue the bottom two caps in such a way that they overlap the top edge of the beak. Then, glue in the rest of the caps. Finally, use a black permanent marker to draw in the eyes.
5) Then come the eyebrows. Just cut them out from your sheet of tin and use a drop of hot glue to stick them above the eyes.
6) Finally, make the feet.  I cut out a semicircle. Then, along the flat edge, I made three small cuts in each corner - these are the claws. Bend the claws down in a 90 degree angle. Bend the part between the claws back and flatten it against the rest of the semicircle. Glue the flat semicircle onto the edge of the lid.
7) The last part is the hook, so that you can hang our owl up on the wall. I used paperclips. Just bend a paperclip into an L shape, stick the smaller part under the edge of the lid and squirt a generous amount of hot glue over it.

The owl is done! Now, you can hang it up on the wall or use it as a garden decoration :-)

This is a fun activity for adults as well as for kids, so go ahead and have some fun making these colorful owls yourself! :-)

Wednesday, April 13, 2016

The Importance of Protection

The Importance of Protection

I love long walks. I do about 10 km every day with my little Boston Terrier, mostly through the woods. I've always had a problem with debris getting into my boots. With my Salomon Quest 4D GTX, I thought the probelm was solved, since the boots are very high. But no: I still get little stones, dust and other debris into the boots. Since I'm fed up with dirty socks and dirty inside of the boots, I decided to do something about it. I know that in Australia they have this wonderful invention called boot protectors (or boot guards or boot covers). Unfortunately, I cannot get these here in my part of the world, so I used a little bushcraft ingenuity (to put i in an Aussie way) and I made myself a fantastic pair of boot protectors - and the best part is that these little babies are for FREE!

Here's how to make your own boot protectors:
1) Find a pair of old tracksuit pants that has elastic bands around the ankles (I just used a pair of old and torn Fruit of the Loom pants).
2) Cut the ends of the trouser legs off. Make sure to cut enough material off to cover the boot completely.
3) If necessary, insert a new elastic band into the edge with the old elastic band in order to fit the boot protectors snuggly around your legs above the boots.

That's it! Don't worry if you cut the trouser legs off a bit crooked. Mine aren't completely straight either but when the protectors are worn over the boots that won't show anyway. I didn't even bother to sew the bottom edges of the protectors. When they get worn out, I'll just throw them away and make myself new ones :-)

I've tried these out and they work great! Nothing gets into the boots any more and my boots as well as my socks are finally clean :-)

Blossoming Garage Roof

Blossoming Garage Roof

We have a small roof over our garage door and every year we put planters with different flowers on it to make it look pretty. This year, it was bulbs. We got 400 different bulbs for free along with some orders from a catalogue last fall. I planted the bulbs into planters and kept them on our glazed balcony over winter. As soon as the weather warmed up, the flowers showed all their beautiful colours and I put the planters onto our little garage roof. The flowers quickly became the centre of attention - for people as well as for the bees :-)